Picasa 3.9.x allows us to embed the face recognition data into an XMP tag on our photos. At long last. However, Google in their wisdom decided to not make this retroactive. Meaning all your existing photos will NOT have the face data embeded even when this feature is activated. Only new photos will get the desired embedding. What follows is detailed instructions on how I (and many other people) have embedded the face recognition tags into existing photos.
I have tested these instructions on Picasa 3.9.13.29 for Mac OS X (10.8.2), on January 28th 2013. This is the latest version of Picasa as of today. I understand different 3.9 subversions have different results when it comes to getting face data to apply to existing photos. So test, test, test before running your whole library through any of these procedures.
First you need a way to test if any of the below methods are actually working on your machine. You can do this with a free desktop app or online.
If you want a desktop tool to view extensive tag data on your photos download and install Xee. This will give you full access to your EXIF tags and other metadata. Alternatively you can check your test images using this website: http://regex.info/exif.cgi
Backup
If you want a way to undo any of this, make sure you have a currently backup (Time Machine, for instance) of your photos and Picasa library database. The is just in case something messes up and can’t be fixed.
The following method is what worked for me. Start out by doing just one photo. Follow the steps. Then follow the Confirmation steps. If you see it worked, continue with you other photos.
Tag Embedding Steps
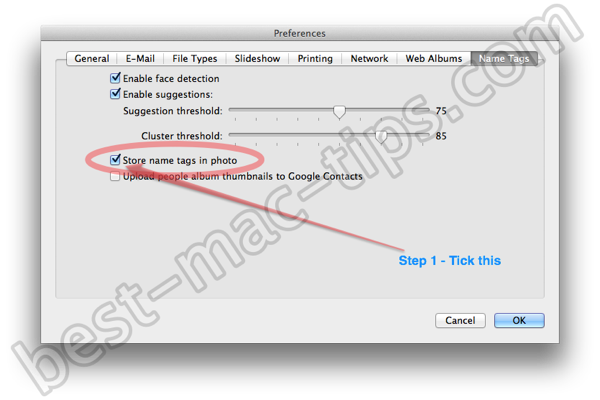
- In Tools/Options/Name Tags, enable “Store name tags in photo”, click OK.
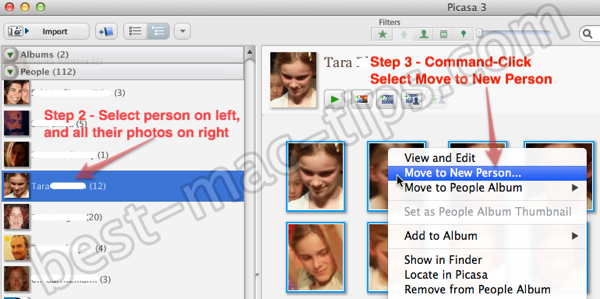
- In the left panel select a name from the People section, and then select all the faces/photos for that person.
- Right click on one of the selected photos and select “Move to New Person”
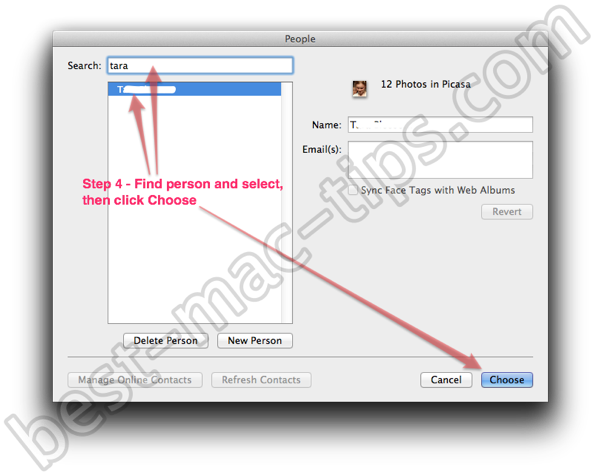
- Being very careful, select the name for the person (i.e. their current name) and click “Choose”.
- The face rectangle and name will now be embedded in all of the photos where that person’s face appears. (Picasa actually embeds all of the faces that appear in the photo at the same time).
- Repeat for every person in your People list.
Here are those instructions with pictures to help those who are not so familiar with computers:
Step 1

Step 2 and 3

Step 4

Repeat for each person in your People list.
Testing the tag embedding
Using the Xee app you can see a new entry in the XMP properties. Actually my pictures had no XMP properties before I embedded the face data. After embedding, the Mwg-rs regions property appeared. If you look through that property you’ll see the name of the person (or people) in the photo you have just embedded face data into.
Step 1 – Select a photo you have just embedded the face data to.
Step 2 – Command click and select “Show in Finder”. Open that file in Xee.
Step 3 – Hit Command-I to bring up the File Info. Look through that Info and find the XMP Properties. If there is no XMP Properties then the tag embedding has not worked.
Step 4 – Look for the Mwg regions property and the person name will be in there somewhere.

You can also test with the online tool.
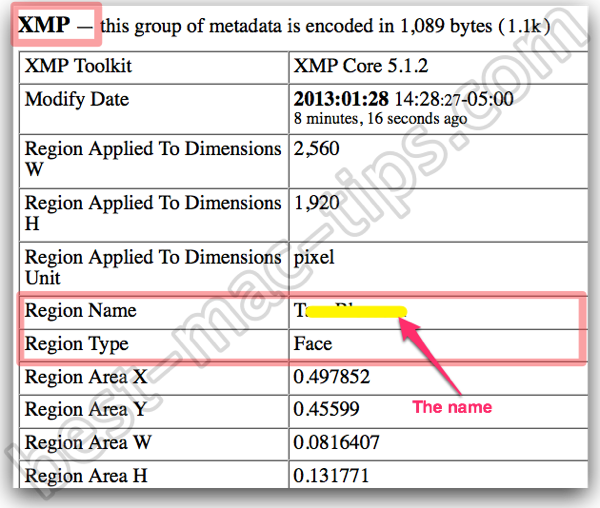
Just upload the file to the site at http://regex.info/exif.cgi
Then in the results take a look at the XMP section, and then look for Region Name. You should see the name(s) of the person(s) in the photo.

Possible issues with other methods
Some people have suggested simply exporting all your photos and creating a new library with them. The biggest issue I see with that is all changes you have made to your photos will be hard wired into the photo. Normally your changes are stored in the database and the original photos are untouched. When you export those changes are applied to the image. When you bring them back into Picasa you will no longer be dealing with your original images but modified ones.


