Have you every created or received a PDF file created from a scanned book? Oftentimes it will display facing pages (which means two facing book pages per PDF page). My instructions all pertain to the cropping and splitting of scanned two-page book spreads. If your usage scenario differs, adjust your actions accordingly.
Step One
Download Briss from: http://sourceforge.net/projects/briss/
Note where you save it;
– Use Terminal to start Briss. Open Terminal.app (just type Terminal into Spotlight). In Terminal, go to the directory where you saved Briss. Use the following command to start Briss:
java -jar briss-0.9.jar
(if the version is not 0.9 you’ll need to modify that part according to the version you downloaded. Basically, it’s just the file name.)
Step Two
If Briss is running, you’re ready to split the page spreads down the middle. Briss is a life-saver in this regard. Well, at least, it’s a massive time-saver. What’s more, it’s free.
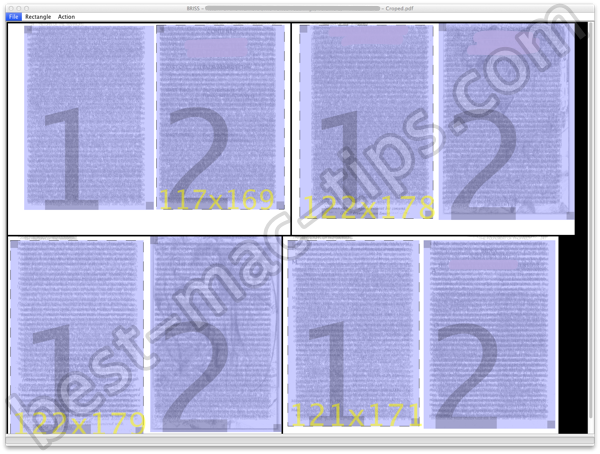
If the scanned pages are sized a little differently, you’ll be presented with multiple page spreads in Briss. This is fine, but can look a little confusing when you first start out with Briss.
Each spread will consist of two sides (pages), but there will only be a Rectangle with the number 1 on each spread. You’ll need to reduce the size of the 1 rectangle (positioning it to the left side of each spread), and add in a 2 rectangle on the right side of each spread.
Take a look at this screen shot. Each panel has 1 on the left, and 2 on the right. This is important.

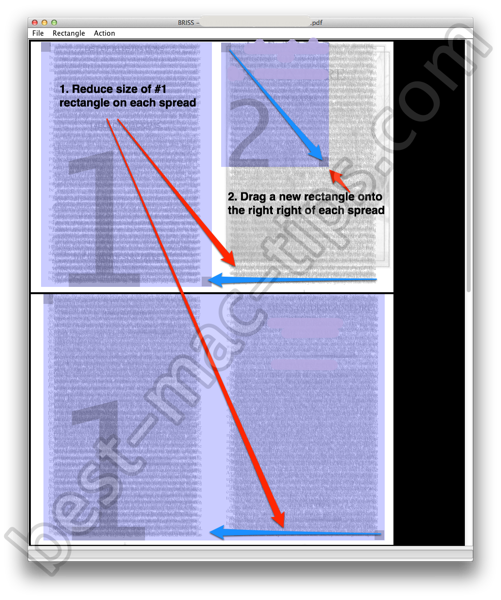
Some documents will come up with just a single rectangle (per spread) numbered “1,” and it will span the entire spread. You will need to reduce the size of each “1” rectangle so it only covers the left page of the spread. Now you can create a new rectangle on each spread. Simply click and drag, roughly starting at the top left of where you want the rectangle, and ending toward the bottom right. You can resize and reposition the new rectangle.
In the following image you will see what I mean. The lower spread is how all the spreads looked after opening the PDF in Briss. The top spread shows the result of me starting to create a second rectangle.

IMPORTANT NOTE: If your document has headers and footers, all books do, you’ll need to make sure these are excluded (as best you can) from the areas covered by the rectangles. The header is the part that says the name of the chapter you’re on, etc. The footer typically has the page numbers, if they aren’t in the header.
If the headers are not lining up nicely when you view the spreads in Briss, you may want to cropped them out before you run the PDF through Briss. You can do the cropping in Apple Preview (the default PDF reader in OS X), and with tools like Skim (free) and PDFPen. Preview works fine. Just remember to export the document or do Save As… – otherwise the crops won’t actually be set in stone. They’ll just appear cropped in Preview.
Step Three
When you have each spread set up with one rectangle per page (two per spread), with “1” on the left and “2” on the right, you’re ready to let Briss perform its magic. Use the Action menu. Select Preview to test the end result. If you’re happy with it, use the Crop PDF option in Action.
You’ll now have a new PDF with the two-page spreads split out into single pages. The headers and footers should have also vanished.
This document is ready for converting into an eBook, if that’s what you wish to do. Use Pages for that, or InDesign, or even Word or one of the free Word-type applications (OpenOffice, etc.)


