


Apple, in their wisdom (I must assume), have made the Sound preferences on OS X somewhat limited. There is no immediately obvious way to play sound through multiple devices, and no way whatsoever to play sound through headphones and the internal speakers simultaneously, or, God forbid, to direct system notifications sounds to one, and standard sound output to the other.
There is, however, a way to play sound simultaneously through external speakers and the internal (or, the headphones—whether connected to headphones or another set of external speakers). Here’s my usage scenario. I have a Bluetooth speaker (the JBL Charge). Using the following method my system plays sound simultaneously through the JBL speaker and my internal speakers (or the desktop speakers I plug into my headphone port).
The magic…
You’ll need to use an OS X system utility called Audio MIDI Setup. Just type that into Spotlight (hit ⌘-Spacebar to access Spotlight quickly).
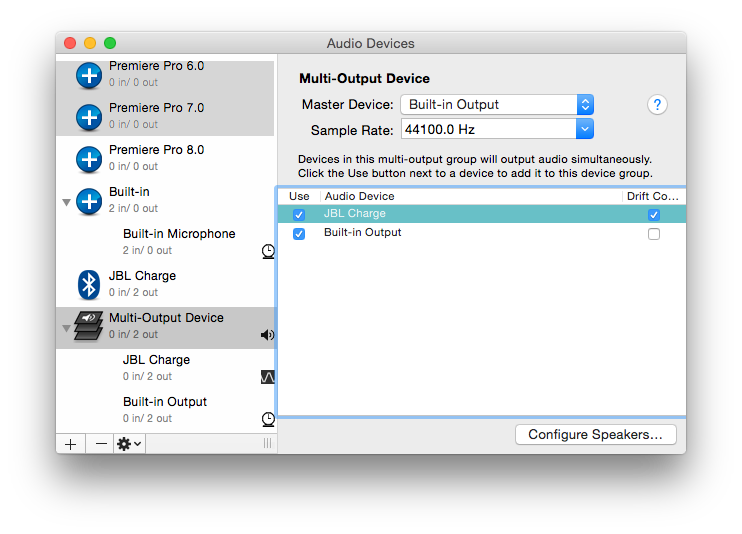
You will see I have a Multi-Output Device (MOD). You can create this by clicking the little + button at the lower left corner. Select Create Multi-Output Device and you’ll end up with something similar. Select the MOD, and in the right panel you can select the devices you’d like sound to play through. I found I had the best results when I set the Master Device to “Built-in Output” (assuming you wish to use that device as part of your MOD). I then ticked Drift Correction on the JBL Charge (in my case). Make sure both devices are set to the same Sample Rate. You do this by selecting each device under the MOD in the left panel. My JBL Charge was locked in to 44,100.0 Hz 2ch-32bit Float, so I set the Built-in Output to this setting too.
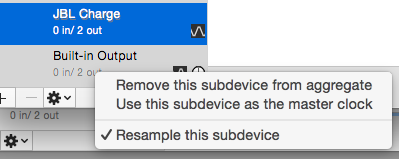
I also found I had best results when I selected Resample this subdevice on each device in the MOD. Just Control-click (or two-finger click, if your Mac is set up for that) to bring up the context menu on each Subdevice.
Changing output selection
You can select the Output Device either in the Audio Devices window or in the standard System Preferences > Sound panel. Of course, you can option-click on the Sound volume icon in your menu bar, and select the Output Device there. If you choose Multi-Output Device, you’ll have sound coming out of all the devices set up in the MOD you set up.
Volume Control
You’ll notice the normal system-wide volume controller no longer works. It’s greyed out. So you’ll need to set the volume in the Audio Devices window of the Audio MIDI Setup application. You can set the volume of each device in your MOD independently.
Help Content
There’s some excellent Help info on how to use the Audio MIDI Setup application. Here’s a copy of some of the content that’s related to what I’ve shared in this article.
Combine audio devices to use a single device
You can combine several audio devices to use as a single device, known as an “aggregate device.” By aggregating devices, you can increase the number of discrete audio inputs and outputs without purchasing more expensive multichannel audio equipment.
For example, if you have an eight-channel audio device and a two-channel audio device, you can combine them to work as a single ten-channel audio device.

For the aggregate device to work correctly, the combined devices in the aggregate device must be set to the same sample rate.
- Click the Add button in the Audio Devices window, then choose Create Aggregate Device. To rename the device, double-click it.
- Select the Use checkbox of each device you want to include in the aggregate device.
The list on the right shows the currently connected audio devices and the number of input and output channels for each device. - To use the clock of one device as the master clock for all the combined devices, choose the device from the Clock Source pop-up menu.
For more information about aggregate device settings, see Aggregate device settings.
You can use the aggregate device for sound input, sound output, or for alerts and sound effects.
To remove an aggregate device, select it on the right side of the Audio Devices window, then click the Delete button .
Aggregate device settings
For your aggregate device to work correctly, all devices in the aggregate device need to have the same sample rate.
The sample rate of each device should match the sample rate of the device chosen from the “Clock source” pop-up menu.
Set the sample rate
- Click the disclosure triangle next to the name of your aggregate device.
- Select one of the devices that’s part of your aggregate device, then choose the sample rate from the first Format pop-up menu.
- Repeat step 2 for all devices in the aggregate device. Make sure to choose the same setting for each device from the first Format pop-up menu.
Enable drift correction
If the devices in your aggregate device aren’t synchronized using hardware, you need to enable drift correction also known as resampling, in order to compensate for drift in the data coming from or going to devices.
- Select the aggregate device in the list.
- Choose your aggregate device settings.
- If all devices in the aggregate device aren’t synchronized through hardware, choose the device with the most reliable clock from the “Clock source” pop-up menu. Then select the Drift Correction checkbox for each device.
- If some of the devices in the aggregate device are synchronized through hardware, choose the hardware synchronization’s clock master from the “Clock source” pop-up menu. Then select the Drift Correction checkbox for each device that isn’t synchronized through hardware.
- If all devices in the aggregate device are synchronized through hardware, choose the hardware synchronization’s clock master from the “Clock source” pop-up menu. Make sure none of the Drift Correction checkboxes are selected.