


In October 2021 I posted a different approach to disabling Microsoft AutoUpdate, as detailed here. That method also allows you to change the autoupdate interval.
What follows is another method, in case the other one doesn’t work for you. Remember to restart your computer after applying either of these methods.
If you have installed Microsoft applications (such as Office) on your Mac computer, you’ve likely noticed Microsoft AutoUpdate (MAU) pops up every day to tell you if there are updates available. I’ve read that for some people this occurs even if there are no updates available. It’ll look something like this:
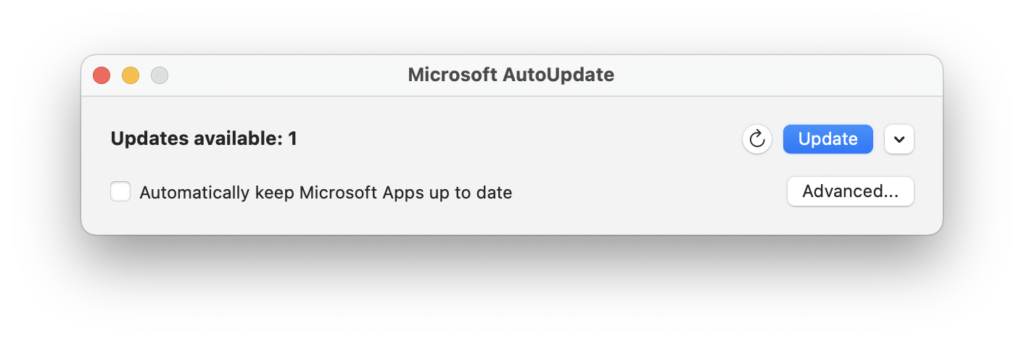
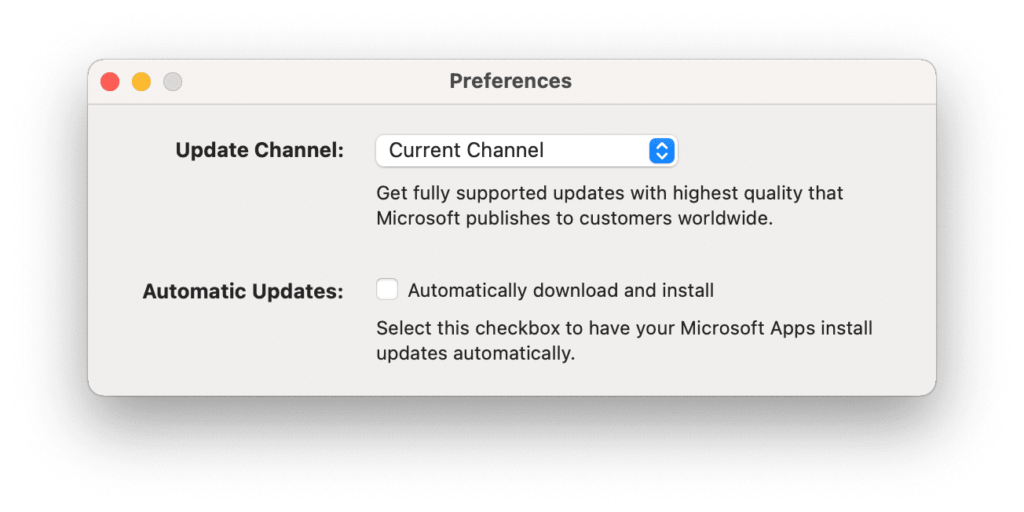
It runs and pops-up even if “Automatic Updates: Automatically download and install” is disabled. This seems to only prevent it automatically downloading and installing updates, but does not stop MAU from running every day.
Some users report excessive CPU usage from MAU. So aside from the potential annoyance factor from the daily pop-ups, it may slow down the computer. Microsoft provides no way to disable MAU from running every day. It can be run manually, so there’s no reason for force it upon the user to have it running automatically.
2023-04-28 (Update) — Another Updated / Alternative Method
Since first publishing this “Method 2” article I’ve installed the Microsoft Edge browser (as I wanted to test out Microsoft’s ChatGPT integration on the Bing.com search engine, and it’s only available when using Edge). It seems to me that Edge has a far more aggressive update routine, and it over-writes the setting changes I’ve suggested below on a regular basis. So if you use Edge you may find that you’re having to reapply the changes more often than you’d like.
In which case, here’s another approach that might work. Let’s call it Method 2.5 …
How to disable Microsoft AutoUpdate (Method 2.5)
The com.microsoft.autoupdate.helper.plist file is the main launch agent for Microsoft AutoUpdate, and it is located in three places as detailed here:
/Library/LaunchAgents/Library/LaunchDaemons//Library/PrivilegedHelperTools
Some articles and forums suggest deleting all three of them. However … If you delete all three of them, it will completely prevent Microsoft AutoUpdate from running on your Mac, whether it’s automatically or manually. This means that you won’t be able to check for updates manually using the Microsoft AutoUpdate app, and you’ll need to download and install updates manually from Microsoft’s website.
If you want to keep the ability to manually check for updates, you can delete only the com.microsoft.autoupdate.helper.plist file from just the /Library/LaunchAgents folder, and leave the other two files in place. This will prevent Microsoft AutoUpdate from running automatically, but you can still launch the app manually to check for updates.
Here are the steps to delete the com.microsoft.autoupdate.helper.plist file from the /Library/LaunchAgents folder:
- Open the Finder app on your Mac.
- Click on the “Go” menu in the top menu bar and select “Go to Folder.” Or use the keyboard shortcut, COMMAND-SHIFT-G.
- In the “Go to Folder” dialog box, paste or type
/Library/LaunchAgentsand click “Go.” - Locate the file named
com.microsoft.autoupdate.helper.plistand drag it to the trash, or select it and hitDeleteon your keyboard. - Enter your administrator password if prompted.
- Restart your Mac.
This will prevent Microsoft AutoUpdate from running automatically, but still allow you to launch the app manually to check for updates. If you ever want to enable Microsoft AutoUpdate again, you can simply reinstall the app to restore the com.microsoft.autoupdate.helper.plist file.
It’s very likely that if you manually run Microsoft AutoUpdate, and installed one or more updates, the above plistfile will be replaced in the process. Preventing Microsoft AutoUpdate from reinstalling the com.microsoft.autoupdate.helper.plist launch agent file is possible, but it requires a few extra steps.
One way to prevent the file from being overwritten is to create an empty folder with the same name as the target file, and then change the permissions of the folder so that it cannot be modified. Here are the steps to do this:
- Open the Terminal app on your Mac.
- Type the following command and press enter:
sudo mkdir /Library/LaunchAgents/com.microsoft.autoupdate.helper.plist
You may be prompted for your admin password.
This will create an empty folder calledcom.microsoft.autoupdate.helper.plistin the/Library/LaunchAgentsdirectory. - Type the following command and press enter:
sudo chmod 000 /Library/LaunchAgents/com.microsoft.autoupdate.helper.plist
This will change the permissions of the new folder to prevent modifications. - Restart your Mac.
Now, when Microsoft AutoUpdate attempts to reinstall the com.microsoft.autoupdate.helper.plist file, it will be unable to do so because the folder with the same name already exists and cannot be modified.
If you ever want to restore AutoUpdate’s ability to run automatically, just delete that folder and restart your Mac.
Try that out, and see if it works for you. Let me know in the comments what you experience.
How to disable Microsoft AutoUpdate (Method 2.0)
UPDATE: If you have implemented “Method 2.5” (above), then the following method is of no relevance, as you will have deleted the file in question. If you find that Microsoftyou could also just use the the step of removing the com.microsoft.autoupdate.helper.plist
You’ll need to use Terminal.app to carry out the following commands.
# Use this to check out the existing configuration
plutil -p /Library/LaunchAgents/com.microsoft.update.agent.plist

# Three commands to change the configuration
sudo plutil -replace Disabled -integer 1 /Library/LaunchAgents/com.microsoft.update.agent.plist
sudo plutil -replace RunAtLoad -integer 0 /Library/LaunchAgents/com.microsoft.update.agent.plist
sudo plutil -replace StartInterval -integer 10368000 /Library/LaunchAgents/com.microsoft.update.agent.plist

# You can check the configuration again to ensure it's changed.
plutil -p /Library/LaunchAgents/com.microsoft.update.agent.plist
After successfully completing the above commands, restart your computer.
To manually check for updates simply use the “Check for updates” option found in the Help menu of any of the Microsoft apps you have installed (such as Word, Excel, Outlook, etc.).
If the above doesn’t solve the issue for you, comment below to let me know.
UPDATE:
Running the command plutil -p /Library/LaunchAgents/com.microsoft.update.agent.plist (before making the changes) will give you the following output, or something close to it.
{
  "Disabled" => 0
  "Label" => "com.microsoft.update.agent"
  "MachServices" => {
    "com.microsoft.update.xpc" => 1
  }
  "ProgramArguments" => [
    0 => "/Library/Application Support/Microsoft/MAU2.0/Microsoft AutoUpdate.app/Contents/MacOS/Microsoft Update Assistant.app/Contents/MacOS/Microsoft Update Assistant"
    1 => "--launchByAgent"
  ]
  "RunAtLoad" => 1
  "StartInterval" => 7200
}
Prevent Microsoft AutoUpdate from changing the settings
I’ve noticed that each I manually run Microsoft AutoUpdate it seems reset those settings back to what Microsoft wants them to be. So you may have to set them back to what you want, each time you run Microsoft AutoUpdate. Alternatively, we can change the permissions on the relevant plist file to prevent Microsoft AutoUpdate from modifying it. Use the following command:
sudo chmod 444 /Library/LaunchAgents/com.microsoft.update.agent.plist
I’m yet to determine if that prevents Microsoft AutoUpdate modifying the file, but in theory it should. Please commend below to let me know how you got on with it, and whether this worked. Thanks.
Automate Disabling Microsoft AutoUpdate
There are situations where Microsoft will successfully over-ride the above-mentioned changed. For example, I recently installed Microsoft Edge browser. After that, the Microsoft AutoUpdater started bugging me again. So there’s how you can create a simple Automator Application to re-disable MS Update each time it rears its ugly head again.
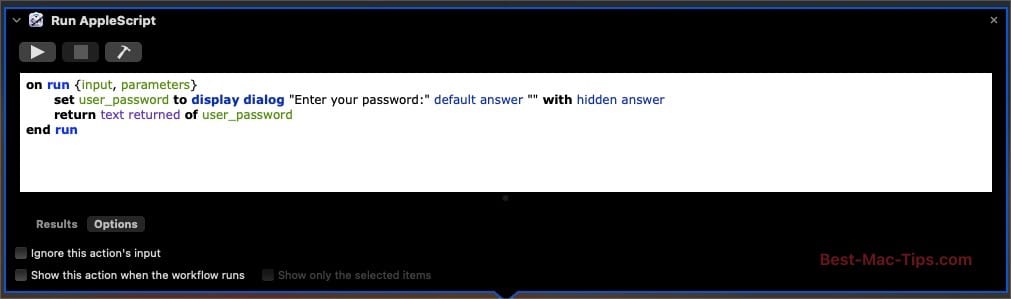
Run Automator. When prompted, tell it to create an Application. Add a “Run AppleScript” action.
Add the following AppleScript code to it:
on run {input, parameters}
    set user_password to display dialog "Enter your password:" default answer "" with hidden answer
    return text returned of user_password
end run
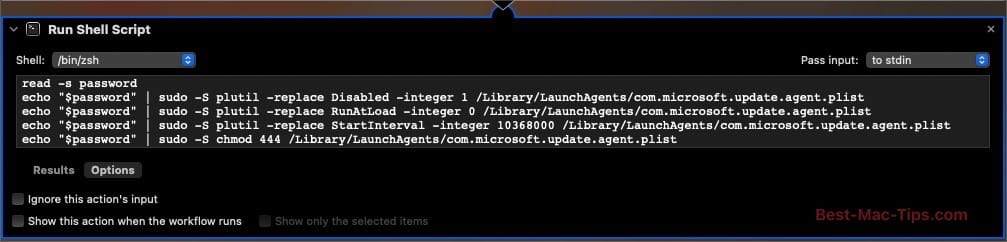
Next add a “Run Shell Script” action, and add the following code:
read -s password
echo "$password" | sudo -S plutil -replace Disabled -integer 1 /Library/LaunchAgents/com.microsoft.update.agent.plist
echo "$password" | sudo -S plutil -replace RunAtLoad -integer 0 /Library/LaunchAgents/com.microsoft.update.agent.plist
echo "$password" | sudo -S plutil -replace StartInterval -integer 10368000 /Library/LaunchAgents/com.microsoft.update.agent.plist
echo "$password" | sudo -S chmod 444 /Library/LaunchAgents/com.microsoft.update.agent.plist
Save the Automator application to your Applications folder, and give it a name that is useful to you. What will make it useful is that it is memorable and, should you forget what you called it, typing something logical into Spotlight will find it for you. In my case, I named it “Microsoft Update Disabler”.
Running that application will restore your preferred settings for the intrusive Microsoft AutoUpdate tool. Below is a screenshot of the final Automator configuration.

Using Microsoft Office on macOS? These books may interest you …


Thanks for this. It seems that with newer version of Microsoft AutoUpdate they the people at MS are increasingly forcing the matter. Now when I manually open the updater, it pops up a warning that the installation isn’t correct (due to the missing .plist file. Also if I disable the updater from being able to run in the background (an option that’s now available in macOS since Ventura came out, MS Updater won’t let me use it until I change that setting back to Allow. Anyway … thanks for your ever helpful tips to get around this B.S. from M.S.