


If you wish to run local web services, such as CalDAV, CardDAV, WebDAV, websites, etc., you may want to connect over SSL. Here are instructions on how to generate self-signed SSL certificates, on Mac OS X that have the CA flag set to TRUE, and which will be accepted my Android devices (which are particularly fussy about how an SSL certificate is cooked up).
As a give-my-private-data-to-questionable-private-cloud-service-companies non-believer, I run my own cloud and sync services locally. Three very handy services are CalDAV, CardDAV, and WebDAV (for sharing and syncing calendars, contacts, and files, respectively), all of which I can run locally on Mac OS X. This allows me to sync my OmniFocus data locally with Android devices, and to sync my contacts and calendars. The one catch is that I want to do all my syncing over encrypted SSL connections. That should be easy, and yet it’s taken me a great many hours to figure out.
The Challenge
The challenge is that although Mac OS X can generate self-signed SSL certificates fairly easily, it does not include a CA (certificate authority) flag in the certificate. For Android devices this flag needs to exist, and be set to True. After spending countless hours reading over forums where those before me had spent countless hours, and days, trying to generate a CA flagged True SSL certificate, and was about to throw in the towel. I have, however, stumbled upon the solution.
The Solution
1. Install OpenSSL
First off, if you have not already done so, you will need to install OpenSSL. If you have the package manager Homebrew installed, you can install OpenSSL with the following command:
brew install openssl
Otherwise, you’ll need to follow the instructions provided here. Or install Homebrew (it’s very handy), and then use it to install OpenSSL.
To install Homebrew, it’s as simple as running the following command in Terminal:
ruby -e "$(curl -fsSL https://raw.githubusercontent.com/Homebrew/install/master/install)"
2. Set your system up for generating SSL and CA
- Create a directory in your home folder (or wherever else makes sense to you) called something like SSL. For instance, ~/SSL will do the trick. In Finder just hit ⇧⌘-G, and type in ~/
That will take you to your home directory. Now create a new folder called something like SSL. In all the following instructions I will assume you create a directory at ~/SSL
In terminal type in: cd ~/ssl
- In Terminal or in Finder (whichever you’re familiar with) create a text file in that folder and call it ca.cnf
Put the following in that file:
[ ca ]
default_ca = mypersonalca

[ mypersonalca ]
#
# WARNING: if you change that, change the default_keyfile in the [req] section below too
# Where everything is kept
dir = ./mypersonalca

# Where the issued certs are kept
certs = $dir/certs

# Where the issued crl are kept
crl_dir = $dir/crl

# database index file
database = $dir/index.txt

# default place for new certs
new_certs_dir = $dir/certs

#
# The CA certificate
certificate = $dir/certs/ca.pem

# The current serial number
serial = $dir/serial

# The current CRL
crl = $dir/crl/crl.pem

# WARNING: if you change that, change the default_keyfile in the [req] section below too
# The private key
private_key = $dir/private/ca.key

# private random number file
RANDFILE = $dir/private/.rand

# The extentions to add to the cert
x509_extensions = usr_cert

# how long to certify for
default_days = 365

# how long before next CRL
default_crl_days= 30

# which md to use; people in comments indicated to use sha1 here
default_md = sha1

# keep passed DN ordering
preserve = no

# Section names
policy = mypolicy
x509_extensions = certificate_extensions

[ mypolicy ]
# Use the supplied information
commonName = supplied
stateOrProvinceName = supplied
countryName = supplied
emailAddress = supplied
organizationName = supplied
organizationalUnitName = optional

[ certificate_extensions ]
# The signed certificate cannot be used as CA
basicConstraints = CA:false

[ req ]
# same as private_key
default_keyfile = ./mypersonalca/private/ca.key

# Which hash to use
default_md = sha1

# No prompts
prompt = no

# This is for CA
subjectKeyIdentifier=hash
authorityKeyIdentifier=keyid:always,issuer
string_mask = utf8only
basicConstraints = CA:true
distinguished_name = root_ca_distinguished_name
x509_extensions = root_ca_extensions

[ root_ca_distinguished_name ]
# EDIT THOSE
commonName = My Personal CA
stateOrProvinceName = California
countryName = US
emailAddress = [email protected]
organizationName = My Personal Certification Authority

[ root_ca_extensions ]
basicConstraints = CA:true
- You might want to make some changes to this file. For instance you can change the default expiry of your certificates. Look for the parameter
default_days = 365and set that to however many days you want. Also, look for# EDIT THESEnear the end of the file, and change those parameters to whatever works for you. -
You need to set up the directories for your CA system to function within. Issue each of the following commands in Terminal:
mkdir -p mypersonalca/certs
mkdir -p mypersonalca/private
mkdir -p mypersonalca/crl
echo "01" > mypersonalca/serial
touch mypersonalca/index.txt
3. Generate your CA
Use the following command in Terminal:
OPENSSL=ca.cnf openssl req -x509 -nodes -days 3650 \
    -newkey rsa:2048 -out mypersonalca/certs/ca.pem \
    -outform PEM -keyout ./mypersonalca/private/ca.key
You will be asked for some information about the CA organisation. Enter something meaningful.
When that’s done, you should have a couple of new files: ~/ssl/mypersonalca/certs/ca.pem and ~/ssl/mypersonalca/private/ca.key.
You should keep the ca.key file secret. This is not for public exposure. The ca.pem file is the one that goes public. This is the public certificate for your newly created Certificate Authority (CA). You can import that into your browser, and devices that you want to automatically trust your self-signed SSL certificates. There is, however, an additional step for using in on Android devices. We’ll cover that in a moment.
4. Generate your self-signed SSL certificate
Here we have two steps. First you create the SSL certificate, and next you certify it with your CA.
- Use the following command to generate your 1024-bit private certificate:
openssl req -newkey rsa:1024 -nodes -sha1 \
   -keyout cert.key -keyform PEM -out cert.req -outform PEM
You will be asked similar questions as those you were asked previously when generation the CA. Use meaningful information, as this is what you, and other people (depending on your usage scenario) will see when asked to trust the certificate.
IMPORTANT: The most important detail you will be asked for is the Common name. This should be the domain name or host identifier you are planning to use this certificate on. Something like, mydomain.com or mymac.local or even localhost (that might work, but I can’t say for sure). You can also use a wild-card, like *.mydomain.com
Now you need to sign your new SSL with your CA. Use the following command:
OPENSSL_CONF=ca.cnf openssl ca -batch -notext -in cert.req -out cert.pem
If you ever need to view the text contents of this file, or make a record of them somewhere, use this command:
openssl x509 -in cert.pem -noout -text
5. Preparing your CA for Android
Android does not import ca.pem files. You need to convert them into a binary file format. To do this, use the following commands:
cd ~/SSL/mypersonalca/certs/
openssl x509 -inform PEM -outform DER -in CA.pem -out CA.crt
If you have your device plugged in and ready for DBA mode transfers, you can use the following command to push the file to your device:
adb push CA.crt /sdcard/
If you have a different path to your device storage, change that command accordingly. Otherwise, in my case I use BitTorrent Sync. So I just drag that CA.crt file into one of the folders that sync to my Android devices, and it automagically makes its way there in a few seconds (assuming BitTorrent Sync is active on each device in that moment).
Once done, you will be able to tell Android to install the CA file via Settings -> Security -> Credential Storage and selecting “Install from storage”, and then follow the prompts.
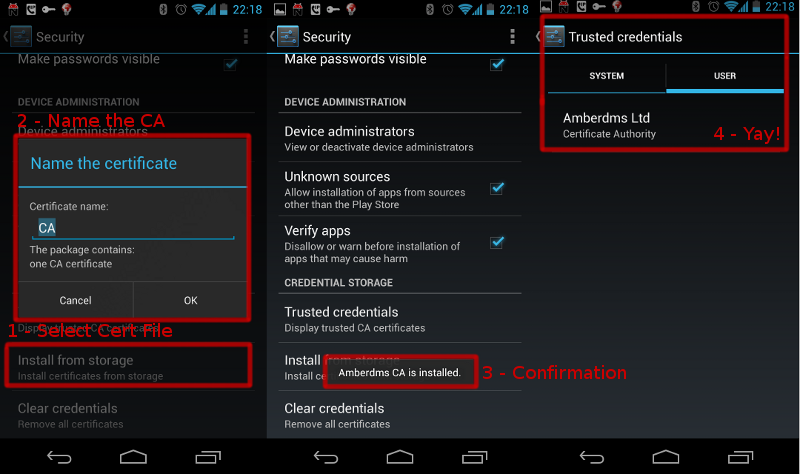
Image and Android instructions courtesy of Jethro Carr
Importing the CA that is already installed on a server
If you have already installed your SSL on a server, you can fetch it into Android using a neat little app call CADroid
Another option is to browse on your Android web browser to RealmB’s Android Certificate Installer and follow the instructions there. It provides a web page which you can upload the ca.pem file to, and it will install it on your device. I’ve not tried it, but I hear it works well.